Getting Started
This documentation will provide steps on getting your first QaNoErr project up and running. We will take an example website login page and some generic Gherkin scenarios.
We will do the following:
AssumptionsFinished projectStarting a new project from scratchReview the composer.json fileOther starter filesInstall QaNoErr Chrome extensionA Little bit of insight to the extensionGenerate the POMLet's review the generated LoginForm.phpWhat does the Wisnet\BehatPom\Base do?Let's review our initial GherkinLet's review the modified Gherkin that utilizes the POMExtend the class for the messagesLet's wait for the asynchronous call to completeReplace duplicates with a snippet and also a partialRun the tests locallyRun the tests against CrossBrowserTesting
Assumptions
gitshould be installed. See https://git-scm.com/composershould be installed. See https://getcomposer.org/javashould be installed. https://www.java.com/en/- To test locally with Chrome,
chrome drivershould be installed. See http://chromedriver.chromium.org/getting-started- Chrome browser installed. See https://www.google.com/chrome/
- For
snapshots,Imagemagickshould be installed. https://www.imagemagick.org/script/index.php - Handlebars templates: See http://handlebarsjs.com/. Nothing to install, but be familiar w/ the concept
- A basic understanding of what
BDDis about
Finished project
If you want to look at the final code, you can look at this project: https://github.com/wisnet/qanoerr-example
Starting a new project from scratch
run the following command composer create-project bartonhammond/qanoerr POMexample -s dev
Change into that directory: cd POMexample
Review the composer.json file
Copy the following to a file called composer.json:
{
    "config": {
        "bin-dir": "vendor/bin",
        "process-timeout": 0,
        "platform": {
            "php": "7.0.27"
        }
    },
    "scripts": {
        "selenium-server": "vendor/bin/selenium-server-standalone  2>&1 | tee .\/selenium-server.log",
        "behat-prep": "vendor/bin/preprocessGherkin",
        "behat":  "composer behat-prep && vendor/bin/behat --config behat.yml --colors",
        "behat-cbt": "composer behat-prep && vendor/bin/buildCBTTests"
    },
    "require-dev": {
        "wisnet/behatpom": "~0.0.1"
    },
    "repositories": [
    {
        "type": "vcs",
        "url": "git@bitbucket.org:wisnet/behatpomchromeextension"
    }
    ],
    "autoload": {
        "classmap": [
        "features",
        "vendor"
        ]
    }
}
The above composer.json defines:
- If there are any executable files, they should be installed in the
vendor/bin. - The
process-timeoutis set to 0 so that long running processes, such as running multiple devices, doesn't time out. - The
selenium-serverhas it's own entry - used it withcomposer selenium-server. When running locally, you will need this to be running in a separate terminal. - The
behat-prepcommand will process thefeatures/gherkin/<name>.hbs.featurefiles and producefeatures/temp/<name>.feature. Thehbsis forhandlebars. It's a templating solution that helps keep the Gherkin files from having duplicate steps. - The
behatcommand will first prep the features and then run them with the defaultbehat.yml - The
behat-cbtcommand also does the prep of the features but then starts running against theCrossBrowserTesting.comsite using the devices defined infeatures/cbt/devices.json. - The
autoloadincludes thefeaturesdirectory as that is where thecontextandpagesclasses are located.
Other starter files
behat.yml- This file runs against a local browserfeatures- Directory to hold numerous directoriesbootstrap- Where the Project Context is locatedpages- Where the QANoErr Chrome Extension puts the POM classes
cbt- Files for running on Cross Browser Testing (CBT)gherkin- Location for Feature hbs filesresults- Directory for results from running on CBTtemp- Directory where the processed Gherkin hbs files are written
Install QaNoErr Chrome extension
We are going to install the chrome extension as an unpacked extension rather then load it from the Chrome store. The reason for this is we want to expose the implementation so that you can modify the templates to meet your requirements. That is achieved much easier if you understand how to load the extension as unpacked.
First navigate within Chrome to the Extensions site as shown here:
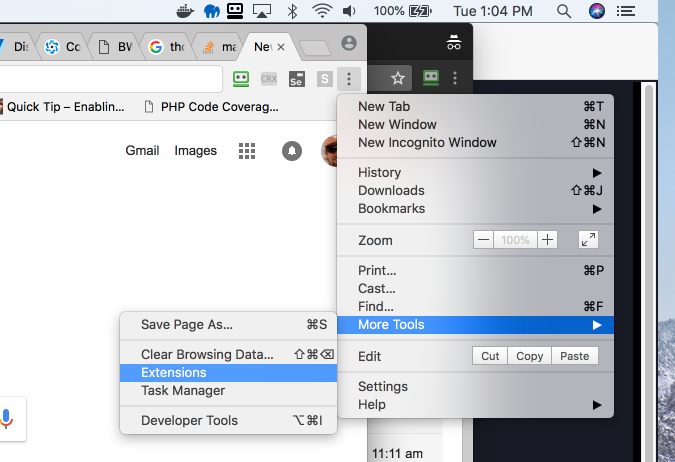
Then click the
Load Unpackedbutton and navigate tovendor/wisnet/behatpom/extension/chrome. See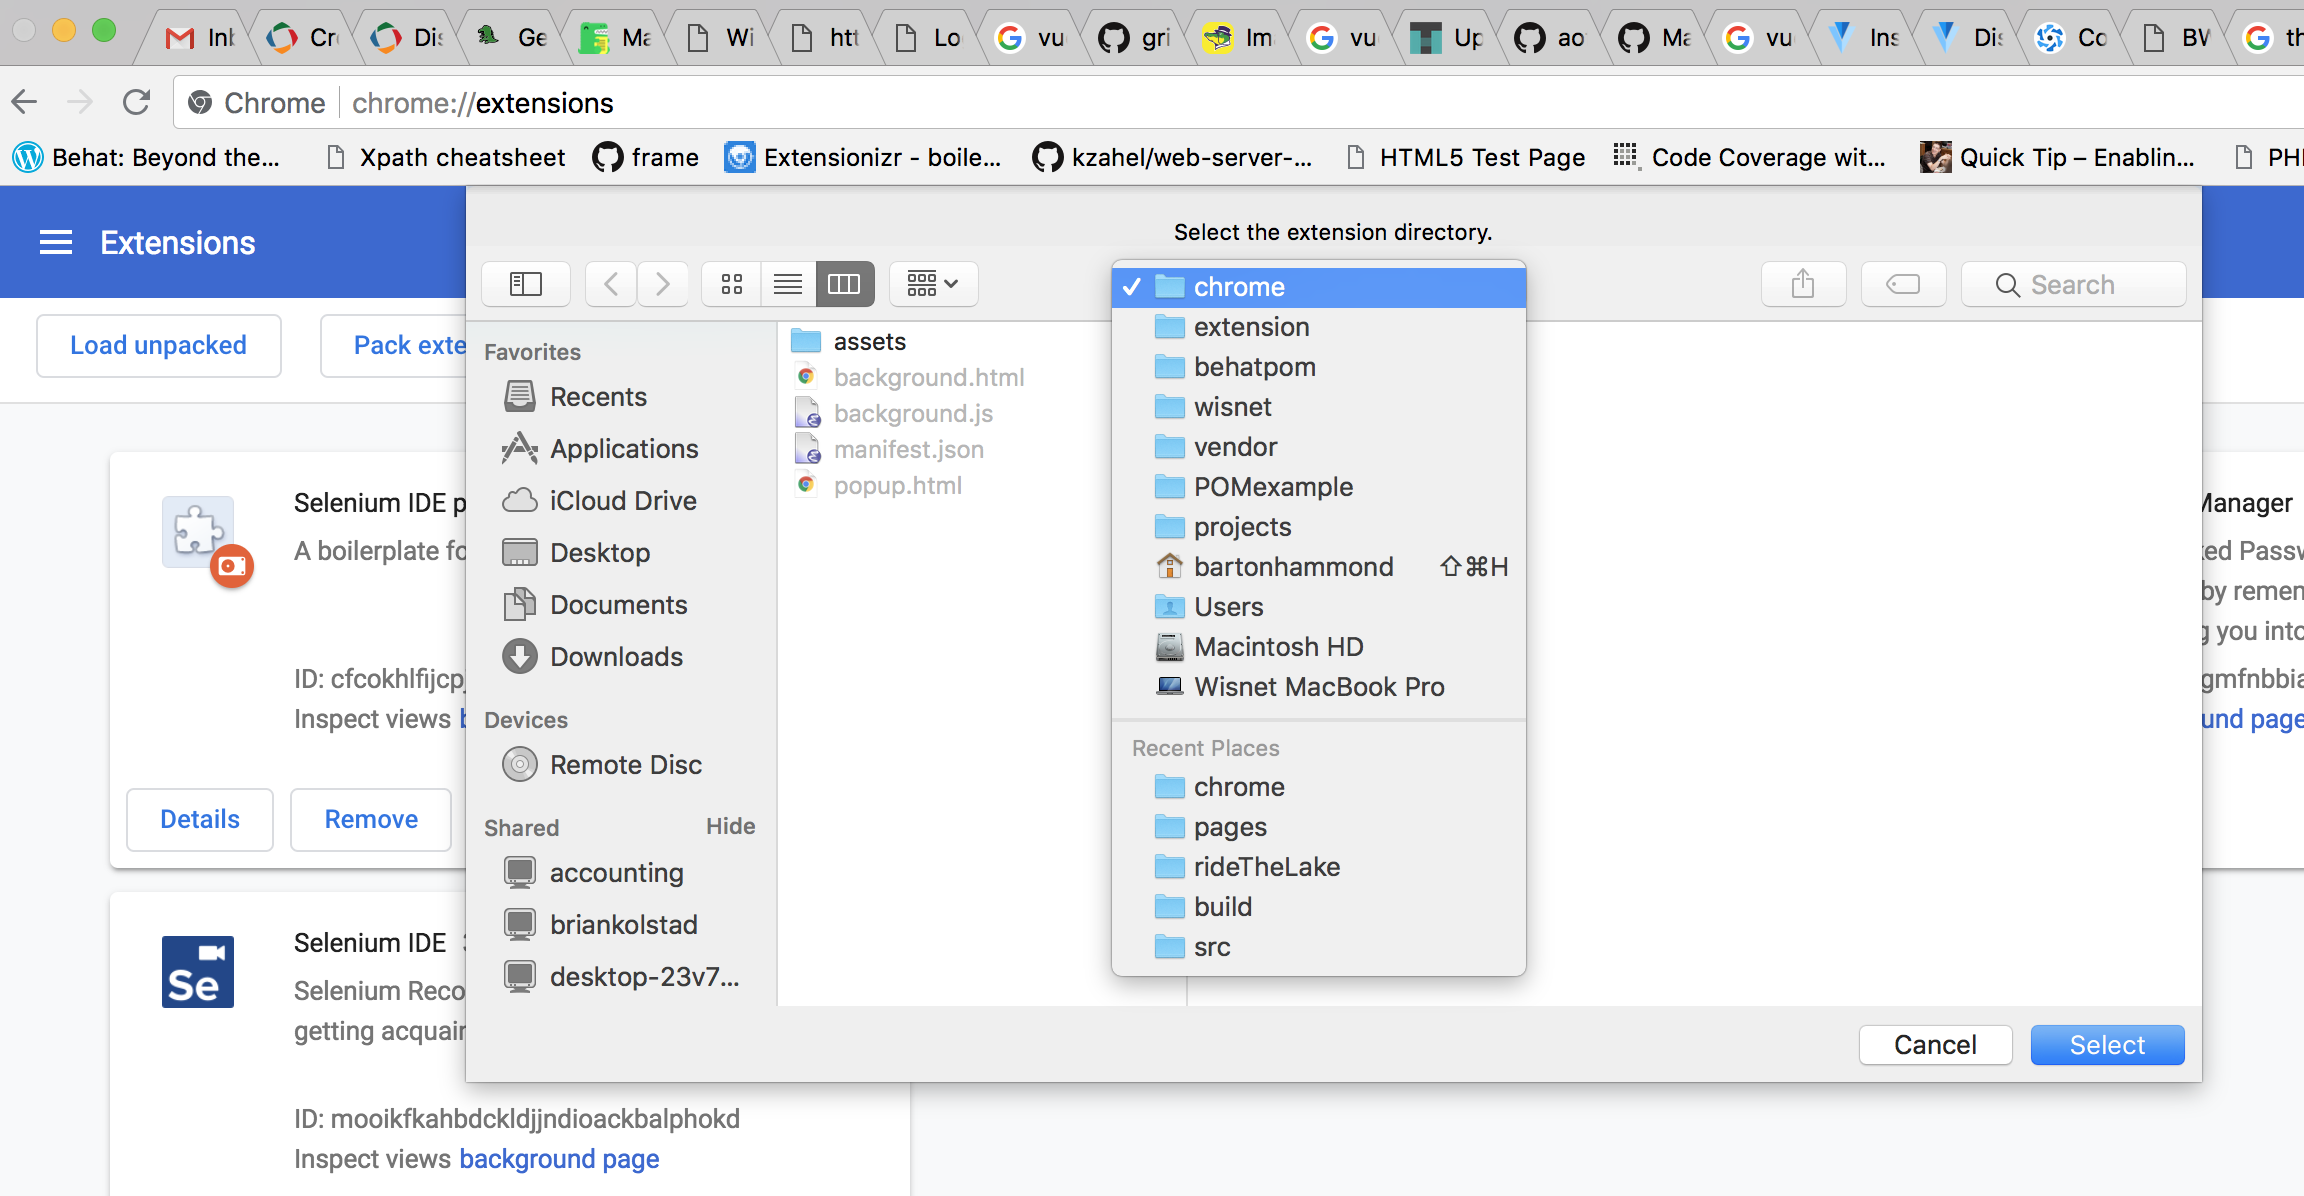
You should now see the extension icon in the top right corner: 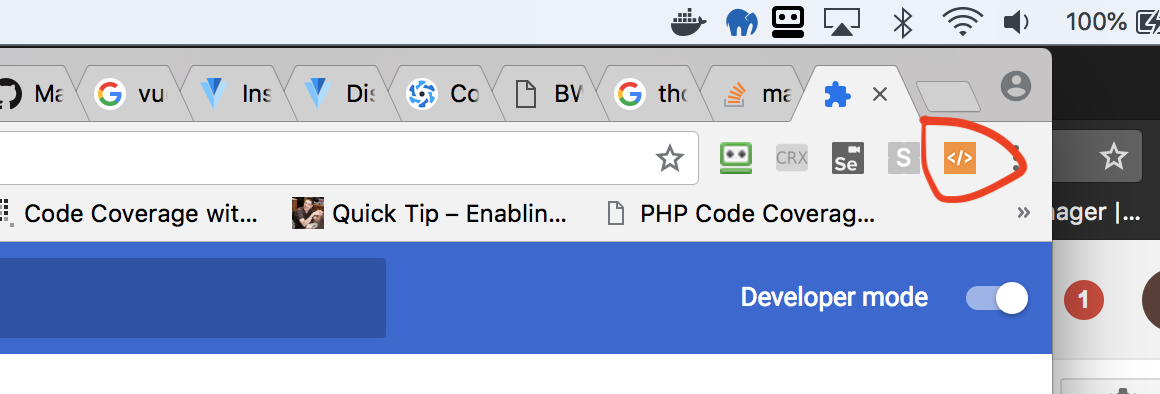
A Little bit of insight to the extension
There are three files that may be of interest to you:
- The first is
/vendor/wisnet/behatpom/extension/chrome/assets/js/generator.js. This file tries to build up all the XPath selectors for elements that we have interest in such asinput,button,a,img,checkbox, etc. We decided that using one type of selector, in our case the XPath, was easiest to understand and utilize. We're sure this code could be improved upon and we welcomepull requests. - The next file is
vendor/wisnet/behatpom/extension/chrome/assets/template/php.hbs. This file is a template that is used by https://github.com/wycats/handlebars.js/ How this works is that we collect all the XPath locators we can and then make them available to this template. - The next interesting file is
vendor/wisnet/behatpom/extension/chrome/assets/js/popup.js. At the bottom of this file is the followingjavascripcode
        var fileName = context.input.pageName + ".php";
        $.get('assets/template/php.hbs', function (data) {
        try {
            var template=Handlebars.compile(data);
            var result = template(context);
            downloadFile(elements.downloader, fileName, result);
        } catch(e) {
            debugger;
        }
        });
- What is happening is all the XPath locators are in the object
context. We get thephp.hbstemplate and compile it. Then thetemplateoperates on thecontextand produces theresult. Thisresultis then downloaded to thefileNamethat was provided.
Generate the POM
When we first started to learn about Automated Testing and decided that Behat was the right choice, we found this sample project from CrossBrowserTesting. They provided not only some Gherkin code but also a page we could test. So we will start with this project they provided and use QANoErr to implement the final solution. You can see their project here: https://github.com/crossbrowsertesting/selenium-php-behat.
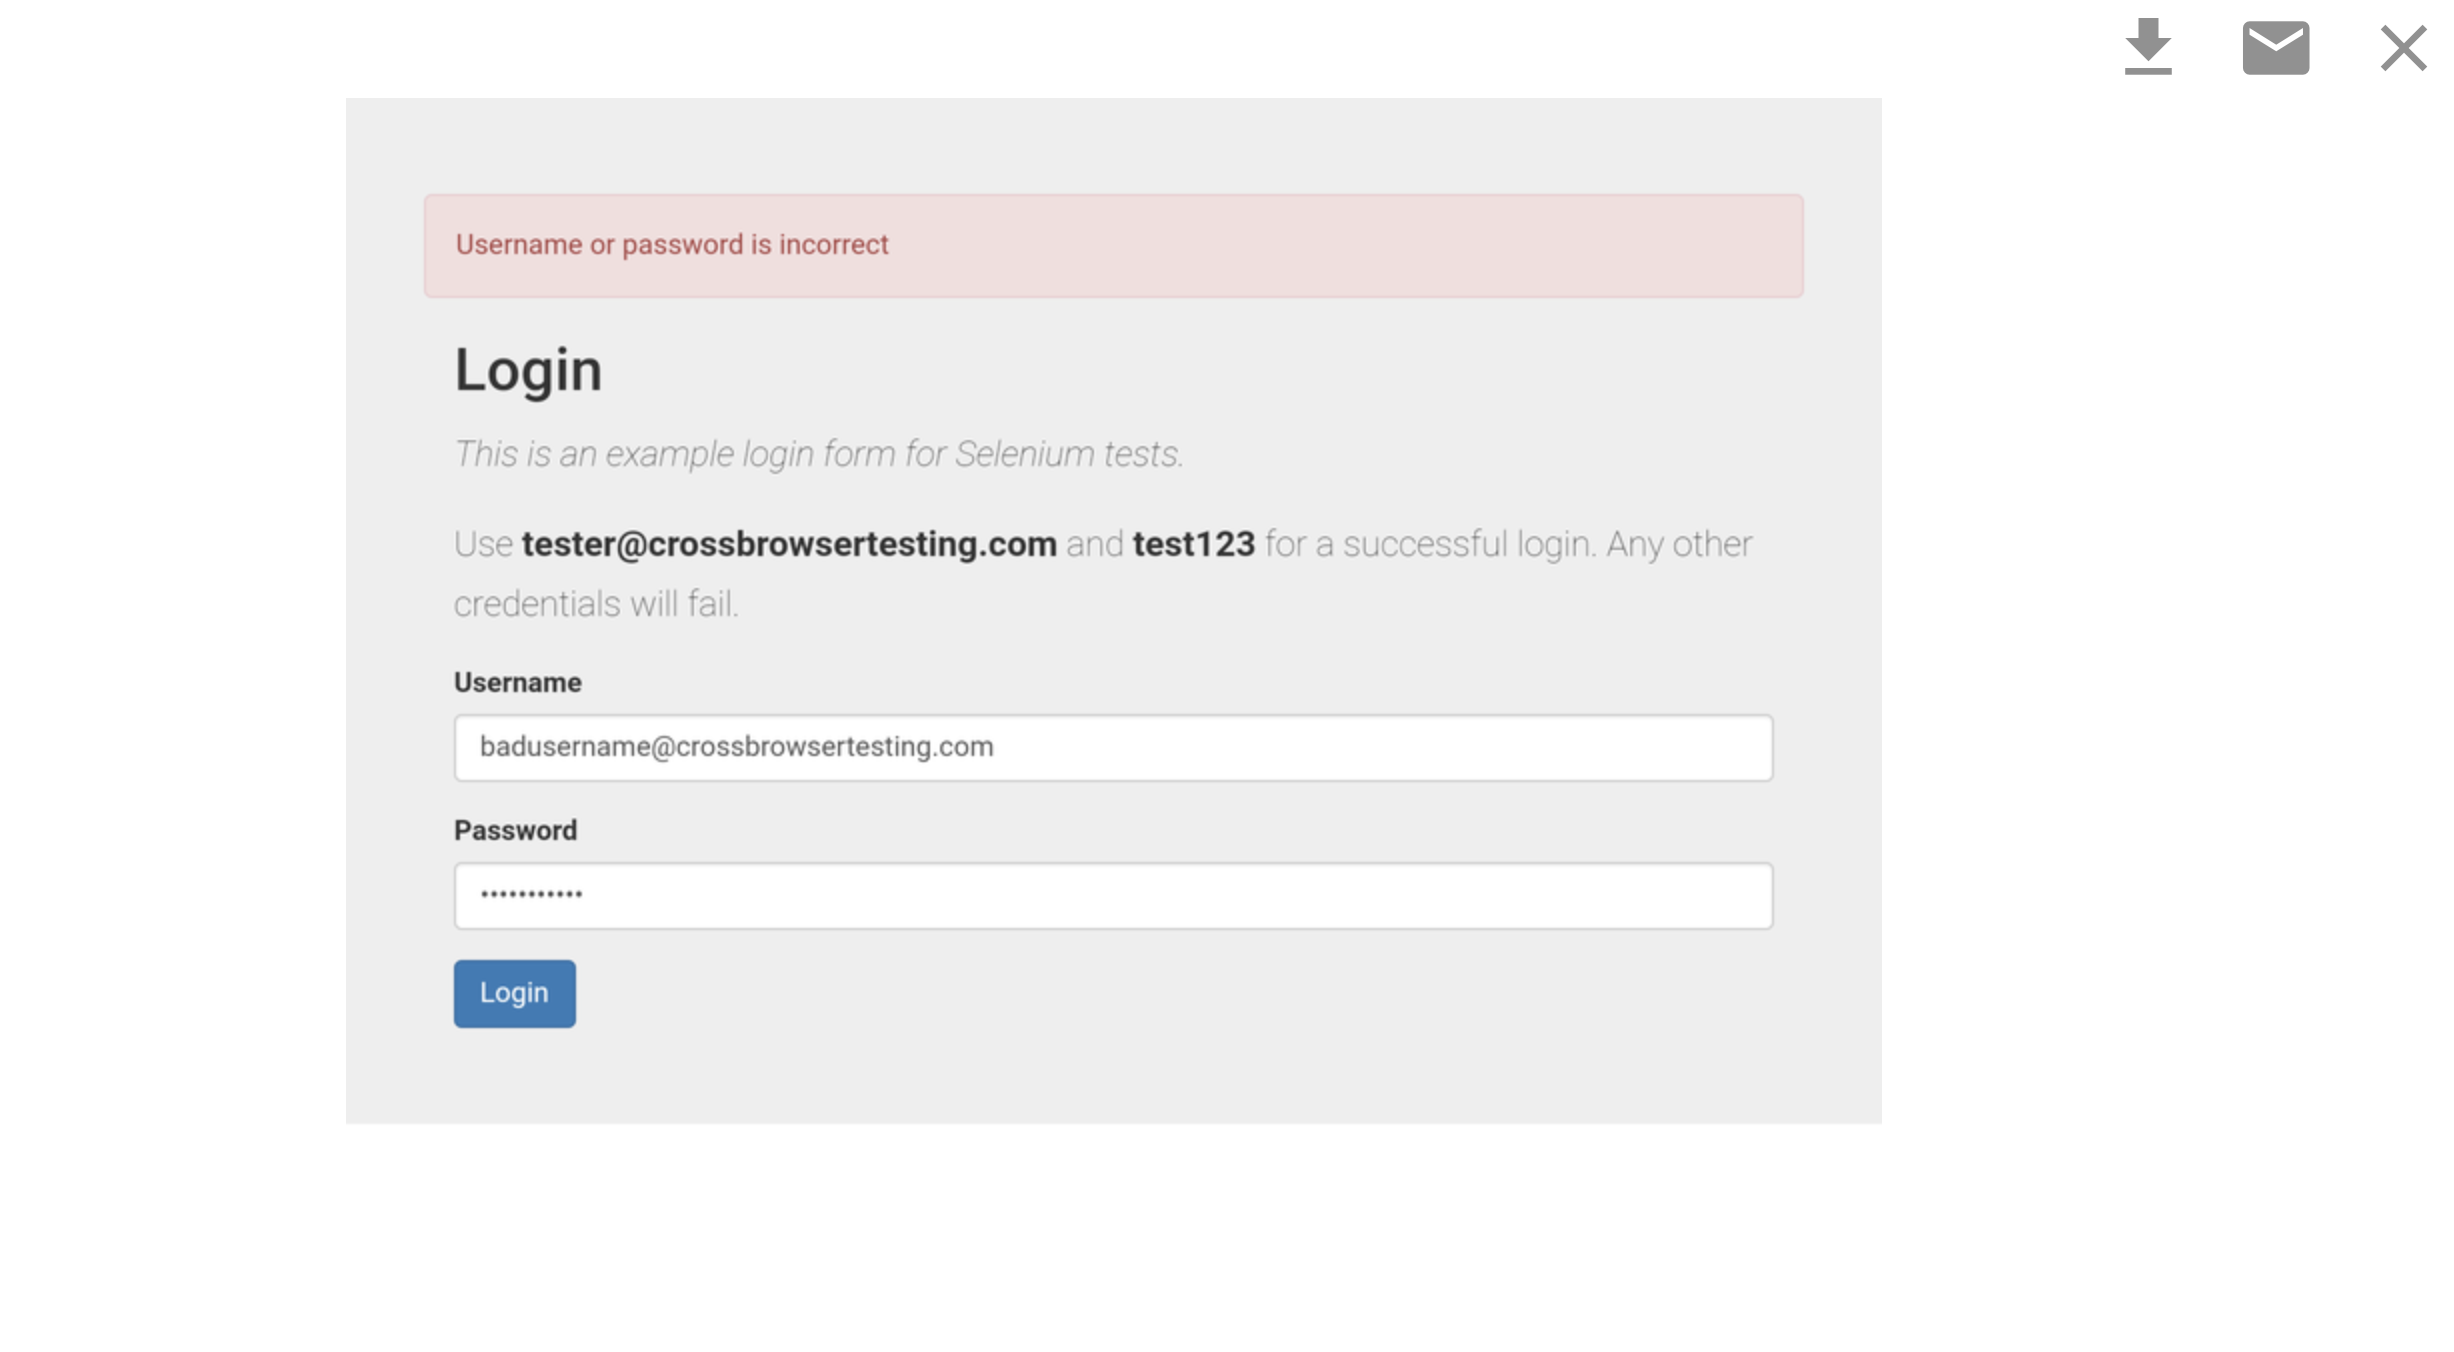
We will be testing this page: http://crossbrowsertesting.github.io/login-form.html. Please navigate there and then click on the Extension icon and fill the form as shown:  . Note that the
 Base Url field is http://crossbrowsertesting.github.io while the login-form.html is the Page Url. The Base Url will be defined within the behat.yml.
When the Extension is used, it stores its settings such as base url, page url, selector, POM page name and trim, so that if you come back to the same URL and use the Extension, the settings will be remembered.
The selector is used as the containing element from which the XPath locators will be determined. This is useful for when there is navigation on every page and you don't want to include that in every POM.
When you click the Generate button, save the file as LoginForm.php and save it to features/bootstrap/pages
Let's review the generated LoginForm.php
<?php
namespace pages;
use Wisnet\BehatPom\Utility;
use Wisnet\BehatPom\Base;

//baseUrl: http://crossbrowsertesting.github.io
//pageUrl: /login-form.html
//selector: //div[@class='container']
//trim: true
//version: 0.0.8
//date: Wed Sep 05 2018 10:56:20 GMT-0500 (Central Daylight Time)

/*
*  Extend class provides support for overriding all the functions
*/
if (file_exists('features/bootstrap/pages/LoginFormExtend.php')){
    include 'features/bootstrap/pages/LoginFormExtend.php';
}
class LoginForm extends Base {
  protected $path = "/login-form.html";

  protected $elements = [
  //Links
   //Textboxes
    "username" =>
    [
      "xpath" => "//*[@id='username']"
    ],
    "password" =>
    [
      "xpath" => "//*[@id='password']"
    ],
   //Selects
    //TextAreas
   //Buttons
    "submit" =>
    [
      "xpath" => "//*[@id='submit']"
    ]

  ];
   /*
   * Create variable if LoginForm exists
   */
    public function __construct($session, $factory, $parameters) {
        parent::__construct($session, $factory, $parameters);

        if (file_exists('features/bootstrap/pages/LoginFormExtend.php')) {
            $this->extend = new \pages\LoginFormExtend;
             $this->extend->addToElements($this);
        }
    }
}
The first few lines are standard PHP namespace and use idioms. The following comments contain what the values were when this class was generated. They are there for reference in case you want to regenerate the class. For example, maybe the UI has changed since this POM was generated.
Then we see the file_exists portion. The hope of our extension and generated POM is that everything we need to interact with the page is generated. But if there is something we need that is not generated, how do we add it? That's where the extend class comes in. The POM looks to see if there is a class named <POM>Extend.php and if so includes it.
Now we see the various elements that have XPath locators, namely, the username, password and submit button.
Note that the LoginForm extends Base. All the action takes place in the the FeatureContext and the Base. The FeatureContext has the functions that the Gherkin interface with. The Base needs to know the elements XPath locators and if there is a extend class.
What does the Wisnet\BehatPom\Base do?
Let's look at a sample function within Base:
    /*
     * Click the button with $name
     */
    public function clickButton($name) {
        if (isset ($this->extend)
            &&
            method_exists($this->extend, 'clickButton')) {
            $this->extend->clickButton($this, $name);
        } else {
            $element = $this->getElement($name);
            $element->click();
        }
When a Gherkin step include click the button type of statement, eventually the Base\clickButton is called. The base looks to see if there is an <POM>Extend> class. If so, does the <POM>Extend class have the clickButton function defined? This is a design pattern used throughout the Base. It gives the developer the opportunity to override the default behaviour. Notice if the clickButton is defined, then the $this object is passed in.
If there is no <POM>Extend nor clickButton method within it, then just call the clickButton on the <POM>.
At the bottom, if we see the <POM>Extend.php class exists, we instantiate it and then call the function addToElements so we can add additional XPath locators. We'll see more of how this works later.
Let's review our initial Gherkin
This is the initial Gherkin that is associated with the project 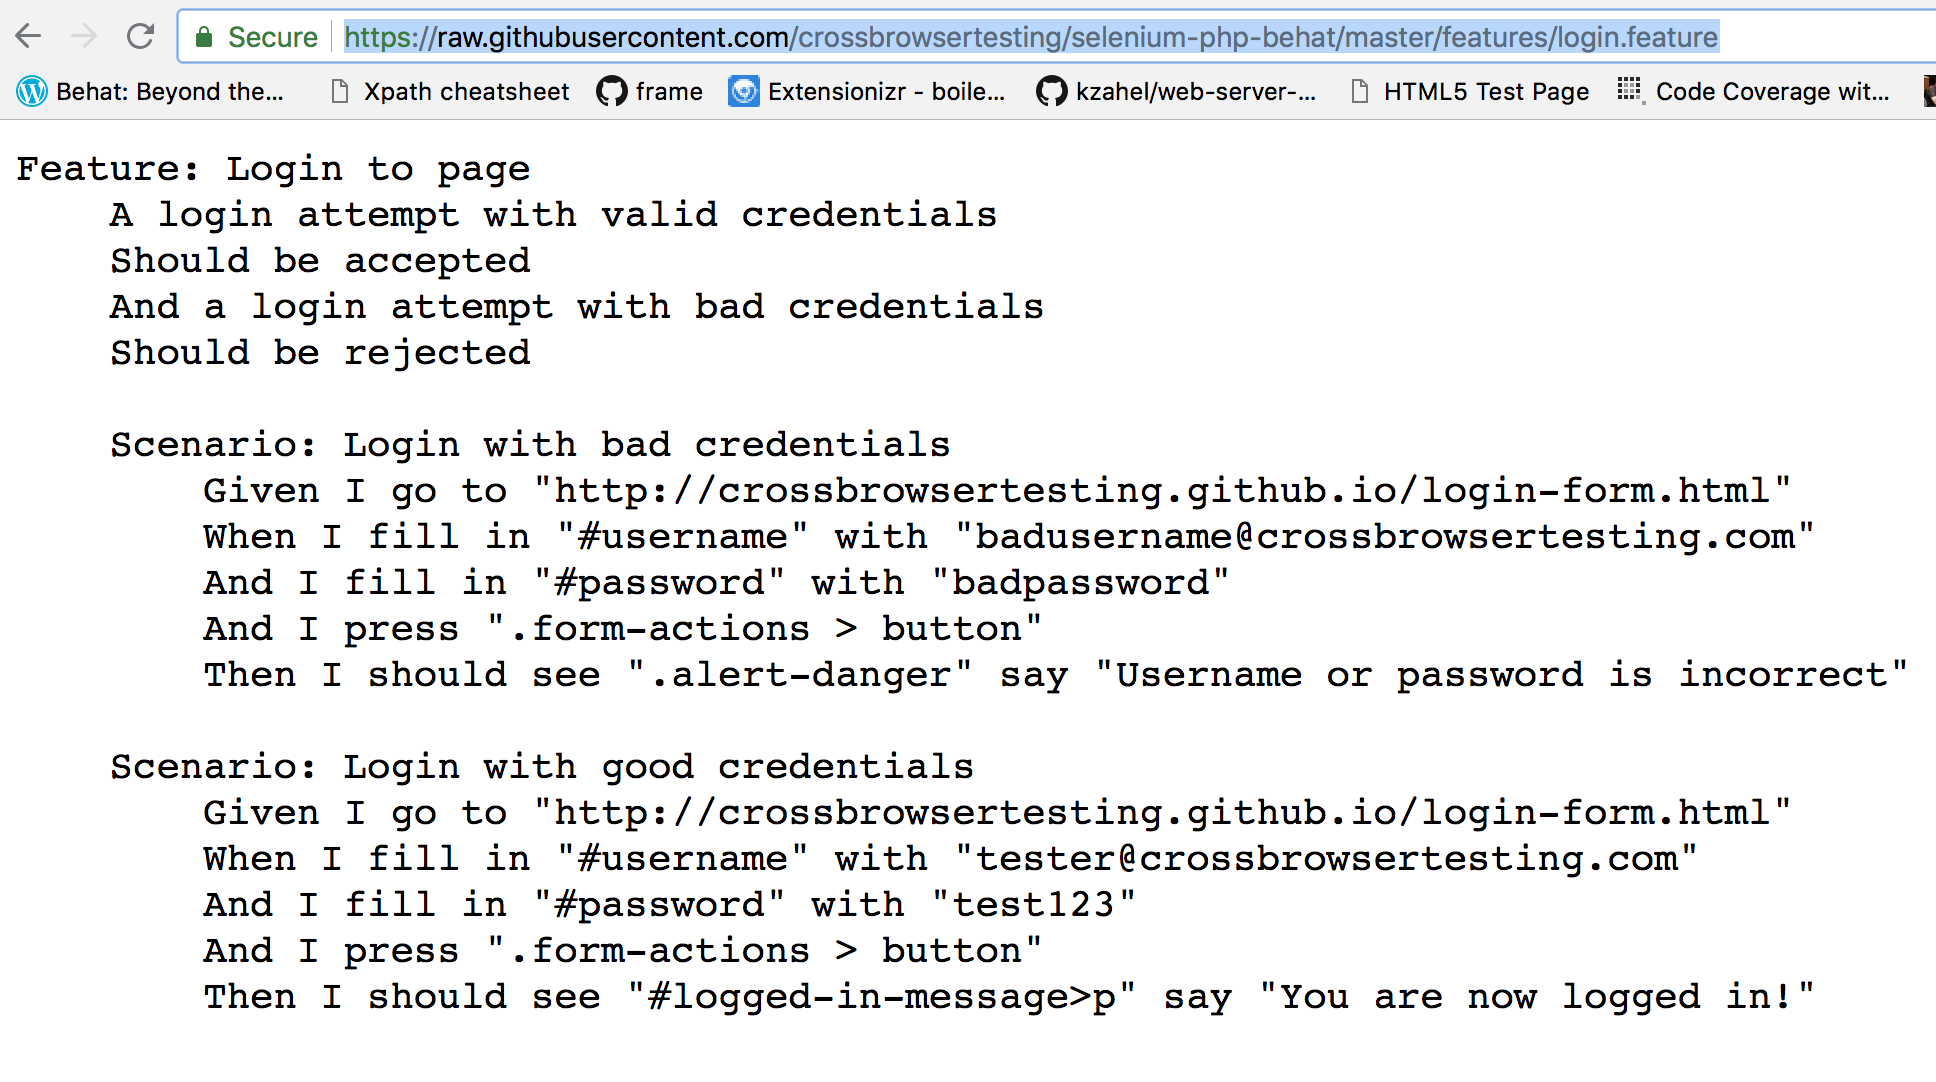
There's a few problems here that we want to address and fix. You'll notice that the selectors are contained w/in the Gherkin. For example, the #username means find an element with the id of username. The selector .form-actions means find the element that has a class named form-actions.
In our opinion, that is bad because we want to review the Gherkin w/ the Business folks and it shouldn't look so geeky. Instead we want the Gherkin to read the way a user would speak.
Another issue with this Gherkin is there is repetition. You can see that we go to the same page and put different values into fields and then press the same button. It would be better if we could keep this DRY (Don't Repeat Yourself).
Let's review the modified Gherkin that utilizes the POM
Feature: Login to page
    A login attempt with valid credentials
    Should be accepted
    And a login attempt with bad credentials
    Should be rejected

    Scenario: Login with bad credentials
        Given I go to the "Login form" page
        And I fill the "username" with "badusername@crossbrowsertesting.com"
        And I fill the "password" with "badpassword"
        And I click the  "submit" button
        Then I should see ".alert-danger" say "Username or password is incorrect"

    Scenario: Login with good credentials
        Given I go to the "Login form" page
        And I fill the "username" with "tester@crossbrowsertesting.com"
        And I fill the "password" with "test123"
        And I press "submit" button
        Then I should see "#logged-in-message>p" say "You are now logged in!"
What you should notice in the above Gherkin, we don't provide the URL for where the page is. That information is contained in the behat.yml and the LoginForm.php class. The behat.yml contains the base url which in our case is http://crossbrowsertesting.github.io. But getting to the login page is known by the LoginForm.php class with it's page url. It knows what URL it was generated from.
Note that the LoginForm class will be dynamically created by referencing it by name. This is a feature of the Page Object Model implementation, see here: https://behat-page-object-extension.readthedocs.io/en/stable/guide/working_with_page_objects.html#instantiating-a-page-object
We can use the username, password and submit values because the generated POM has those XPath locators defined.
Extend the class for the messages
Notice that there are two messages that will display:
- The failure case when the credentials are incorrect
- The successful case. Looking at the
features/bootstrap/pages/LoginForm.php, we do not see these messages within the$elements.
So we have to add them by hand. We do this by creating a class that follows a specific naming convention of <POM>Extend.php.
If you look at the bottom of the LoginForm.php class, you'll see this constructor:
   /*
   * Create variable if LoginForm exists
   */
    public function __construct($session, $factory, $parameters) {
        parent::__construct($session, $factory, $parameters);

        if (file_exists('features/bootstrap/pages/LoginFormExtend.php')) {
            $this->extend = new \pages\LoginFormExtend;
             $this->extend->addToElements($this);
        }
    }
If a class is created that is called LoginFormExtend.php, then it will be instantiated and a method called addToElements will be called. That method provides us the way to add more XPath locators for elements that the Chrome Extension didn't find.
So let's create the extend class called features/bootstrap/pages/LoginFormExtend.php and make it look like this:
<?php
namespace pages;
use Wisnet\BehatPom\Utility;

class LoginFormExtend {
    public function addToElements($parent) {

    }
}
Go back to the online form at http://crossbrowsertesting.github.io/login-form.html and put in bad credentials and click the Login button. Now, inspect the message that says Username or password is incorrect. Place your mouse on the message and right-click to bring up the context menu and select Inspect. You should see something like this: 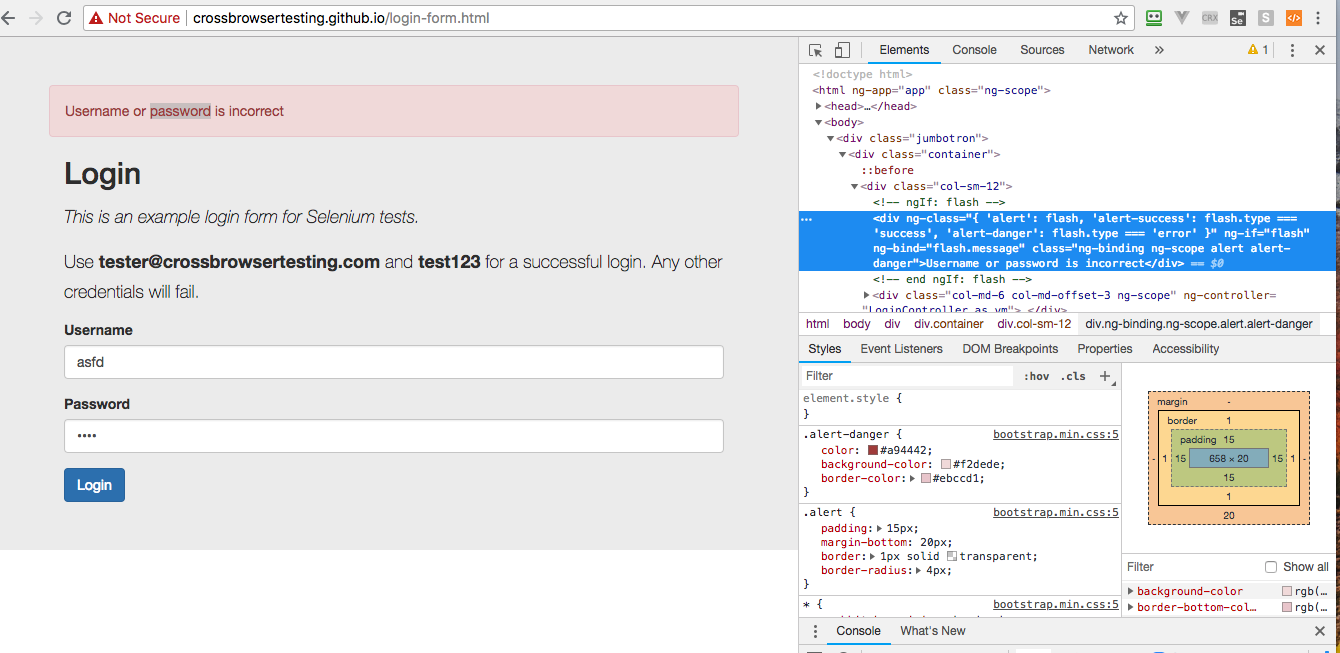
Now let's figure out what the XPath would be. Copy the value for the class on this element which should be ng-binding ng-scope alert alert-danger. We can use that in our XPath selector w/ this: $x("//div[@class='ng-binding ng-scope alert alert-danger']"). Click on the Console tab in the Chrome browser and enter that $xpath statement to confirm you get the element.
So now we have to add that to our LoginFormExtend.php class to now look like this:
<?php
namespace pages;
use Wisnet\BehatPom\Utility;

class LoginFormExtend {
    public function addToElements($parent) {
        $xpath = array("xpath" => "//div[@class='ng-binding ng-scope alert alert-danger']");
        $parent->_addToElements("Username or password is incorrect", $xpath);
    }
}
We now put in correct credentials in the Login Form and click the Login button to see the valid message. The message You are now logged in! has an id of logged-in. You can see this by inspecting on the element. So our xpath is quite simple: $x("//p[@id='logged-in']").
Let's update the LoginFormExtend to include this message. LoginFormExtend.php should now look like:
<?php
namespace pages;
use Wisnet\BehatPom\Utility;

class LoginFormExtend {
    public function addToElements($parent) {
        $xpath = array("xpath" => "//div[@class='ng-binding ng-scope alert alert-danger']");
        $parent->_addToElements("Username or password is incorrect", $xpath);

        $xpath = array("xpath" => "//p[@id='logged-in']");
        $parent->_addToElements("You are now logged in!", $xpath);
    }
}
Let's update our Gherkin code to this:
Feature: Login to page
    A login attempt with valid credentials
    Should be accepted
    And a login attempt with bad credentials
    Should be rejected

    Scenario: Login with bad credentials
        Given I go to the "Login form" page
        And I fill the "username" with "badusername@crossbrowsertesting.com"
        And I fill the "password" with "badpassword"
        And I click the  "submit" button
        Then the "Username or password is incorrect" element exists

    Scenario: Login with good credentials
        Given I go to the "Login form" page
        And I fill the "username" with "tester@crossbrowsertesting.com"
        And I fill the "password" with "test123"
        And I click the "submit" button
        Then the "You are now logged in!" element exists
Let's wait for the asynchronous call to complete
When we clicked the submit button, we noticed a time delay until a message was displayed. During that delay, we saw a orange message informing us of the action. when you clicked the Submit button, a message displayed with the text "Verifying credentials". Some folks would like to add a And I wait "3" second step. That is not a good solution for waiting for some AJax call to complete.
Let's figure out how to wait for that "spinner" to disappear.
Go back to the Chrome developers tool and open the Elements tab. Scroll through the html looking for the comment that looks like <!-- Processing progress bar-->. On the next element you'll see the following:
<div class="progress ng-hide" ng-show="vm.dataLoading" style="margin-top:20px">
We want to see what happens to this div when we click the Login button. So place your mouse over that div and scroll down the context menu until you find Break on. Select that item and then in the submenu, click on attribute modification. See 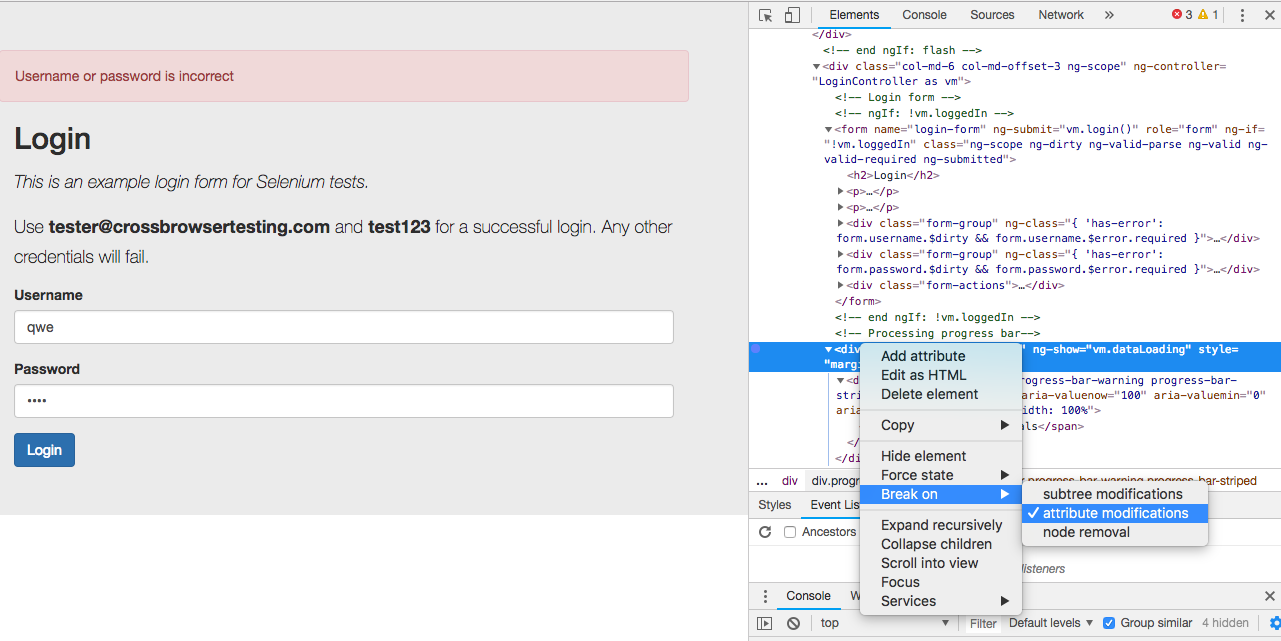
Now, put values into the two fields (username and password) and click the Login button. You will now see that you've stopped in the debugger. What is happening is that the class of ng-hide is going to be removed from the div. Go ahead and let the debugger continue. After a few moments, the debugger will stop again. This time the code is adding back in the ng-hide class.
You can close the developer console now.
What we want to do is wait for the div with only the class progress to disappear. There is a step that supports this. It will look like this in the gherkin:
And I wait for the "Verifying credentials" spinner
It's much better to wait for events to complete then to sleep for some period of time waiting for the page to complete processing and QaNoErr provides that functionality.
So now our loginform.hbs.feature looks like this:
Feature: Login to page
    A login attempt with valid credentials
    Should be accepted
    And a login attempt with bad credentials
    Should be rejected

    Scenario: Login with bad credentials
        Given I go to the "Login form" page
        And I fill the "username" with "badusername@crossbrowsertesting.com"
        And I fill the "password" with "badpassword"
        And I click the "submit" button
        And I wait for the "Verifying credentials" spinner
        Then the "Username or password is incorrect" element exists

    Scenario: Login with good credentials
        Given I go to the "Login form" page
        And I fill the "username" with "tester@crossbrowsertesting.com"
        And I fill the "password" with "test123"
        And I click the "submit" button
        And I wait for the "Verifying credentials" spinner
        Then the "You are now logged in!" element exists
Replace duplicates with a snippet and also a partial
Notice in the above Gherkin code that we are repeating the navigation to the Login form page, the filling of the username and password and clicking the submit button. We could leave this like it is and it would work just fine. But for teaching purposes, let's introduce a snippet and a partial and rework this Gherkin.
QaNoErr supports partials and snippets; Snippets are just plain code that gets replaced within the feature; A partial is similiar but also supports the passing of parameters.
Let's start w/ a snippet as it's the easier case. I see this statement repeated twice: And I wait for the "Verifying credentials" spinner. Let's make that into a snippet. First, create a file with this naming convention: <snippetName>.snippet.feature; For our purpose, let's name the snippet verify_credentials. So make a file called verify_credentials.snippet.feature win the same directory, namely features/gherkin; Take the line in question and add it to that file.
So now our verify_credentials.snippet.feature has this content:
And I wait for the "Verifying credentials" spinner
Now, the final step. Back in the loginForm.hbs.feature, replace the line we are turning into a snippet with this: {{{verify_credentials}}}. You will do this two times.
Now are feature should look like this:
Feature: Login to page
    A login attempt with valid credentials
    Should be accepted
    And a login attempt with bad credentials
    Should be rejected

    Scenario: Login with bad credentials
        Given I go to the "Login form" page
        And I fill the "username" with "badusername@crossbrowsertesting.com"
        And I fill the "password" with "badpassword"
        And I click the "submit" button
{{{verifying_credentials}}}
        Then the "Username or password is incorrect" element exists

    Scenario: Login with good credentials
        Given I go to the "Login form" page
        And I fill the "username" with "tester@crossbrowsertesting.com"
        And I fill the "password" with "test123"
        And I click the "submit" button
{{{verifying_credentials}}}
        Then the "You are now logged in!" element exists
Since we've updated our Gherkin, we need to run the compose behat-prep to generate the features. So run that command and then look into the features/temp directory. You'll see the loginForm.feature now has the statements replacing the {{{verifying_credentials}}}. This is a quick and easy way to avoid copying Gherkin code. This principal is sometimes referred to as DRY - Don't Repeat Yourself.
So now we want to look at creating a partial; A partial is a snippet with parameters. Here's what our partial will be invoked from within the features/gherkin/loginForm.hbs.feature
{{>verifying_credentials username="badusername@crossbrowsertesting.com" password="badpassword"}}
And here's what that partial will look like:
        Given I go to the "Login form" page
        And I fill the "username" with "{{name}}"
        And I fill the "password" with "{{password}}"
        And I click the "submit" button
Note that the variable {{name}} and {{password}} are passed into the partial.
So now our final Gherkin looks like this:
Feature: Login to page
    A login attempt with valid credentials
    Should be accepted
    And a login attempt with bad credentials
    Should be rejected

    Scenario: Login with bad credentials
{{>verifying_credentials name="badusername@crossbrowsertesting.com" password="badpassword"}}
{{{verifying_credentials}}}
        Then the "Username or password is incorrect" element exists

    Scenario: Login with good credentials
{{>verifying_credentials name="tester@crossbrowsertesting.com" password="test123"}}
{{{verifying_credentials}}}
        Then the "You are now logged in!" element exists
Run the tests locally
Run tests locally means that you will be running a terminal window with the Selenium Server and another terminal runing Behat. The Selenium server takes the requests from Behat and interfaces w/ the browser. You will need to install the browser driver. For chrome, you can download from http://chromedriver.chromium.org/downloads.
Copy the behat.yml from vendor/wisnet/behatpom/project-template/ to the projects base directory. It should be like this:
default:
  suites:
    home:
      paths: ["%paths.base%/features/temp/loginForm.feature"]
      contexts: [ProjectContext]

  extensions:
    Behat\MinkExtension:
      browser_name: 'chrome'
      javascript_session: selenium2
      selenium2:
        wd_host: http://0.0.0.0:4444/wd/hub
      base_url: http://crossbrowsertesting.github.io

    SensioLabs\Behat\PageObjectExtension:
      namespaces:
        page: [pages]
        element: [pages]
Some points about the above behat.yml file:
This defines where the
featurewill be located which in our case is"%paths.base%/features/temp/loginForm.feature"]. When we runcomposer behat-prep, the*.hbs.featurefiles infeatures/gherkinare processed and generated out to thefeatures/tempdirectory. This is where we will run ourfeaturesfrom.Our context is
ProjectContextand is located infeatures/bootstrap.We will be testing w/
chrome. If you want to switch tosafariorfirefoxchange thebrowser_namevalue. Just remember to install the appropriate driver.We will utilize the
selenium2session since we require javascript support.The
selenium hosthas the address ofhttp://0.0.0.0:4444/wd/hub. This is where theselenium standalone serverwill be listening for commands from Behat.The base url for this test is
http://crossbrowsertesting.github.io. Recall that when we utilized the QaNoErr Chrome Extension to generate the Page Object Model, we identified the base url versus thepage url. By keeping thepage urlseparate, we can change thebase urland everything will work. For example, at wisnet, we can run our tests against a local server with thisbase url:https://wwww.twlw.dev. When we push ourdevelopbranch, we then test w/ a differentbase url, namelyhttps://twlwdev.wpengine.com.The path to the POM classes are defined as
pages
So now let's run our local test:
- Open a terminal window and navigate to the project.
- run the command
composer seleniumserver. Note this requires that Java be installed. - Open another terminal window and navigate to the project
- run the command
composer behat. This does 2 things:- First, runs
composer behat-prepto process thefeaturefiles infeature/gherkin - Second, runs
vendor/bin/behat using the localbehat.yml`
- First, runs
If all goes well, we should see the following output:
> composer behat-prep && vendor/bin/behat --config behat.yml --colors
> vendor/bin/preprocessGherkin
Feature: Login to page
    A login attempt with valid credentials
    Should be accepted
    And a login attempt with bad credentials
    Should be rejected

  Scenario: Login with bad credentials                                   # features/temp/loginForm.feature:7
    Given I go to the "Login form" page                                  # ProjectContext::iGoToThePage()
    And I fill the "username" with "badusername@crossbrowsertesting.com" # ProjectContext::iFillTheWith()
    And I fill the "password" with "badpassword"                         # ProjectContext::iFillTheWith()
    And I click the "submit" button                                      # ProjectContext::iClickTheButton()
    And I wait for the "Verifying credentials" spinner                   # ProjectContext::iWaitForTheSpinner()
    Then the "Username or password is incorrect" element exists          # ProjectContext::theElementExists()

  Scenario: Login with good credentials                             # features/temp/loginForm.feature:17
    Given I go to the "Login form" page                             # ProjectContext::iGoToThePage()
    And I fill the "username" with "tester@crossbrowsertesting.com" # ProjectContext::iFillTheWith()
    And I fill the "password" with "test123"                        # ProjectContext::iFillTheWith()
    And I click the "submit" button                                 # ProjectContext::iClickTheButton()
    And I wait for the "Verifying credentials" spinner              # ProjectContext::iWaitForTheSpinner()
    Then the "You are now logged in!" element exists                # ProjectContext::theElementExists()

2 scenarios (2 passed)
12 steps (12 passed)
0m10.52s (11.26Mb)
Run the tests against CrossBrowserTesting
To run against https://crossbrowsertesting.com, you will need an account. You can sign up for a free account here: https://crossbrowsertesting.com/freetrial. You should already have the necessary files in features/cbt but if not, copy the files from vendor/wisnet/behatpom/project-template/features/cbt
Copy the features/cbt/cbt.env.json.example to features/cbt/cbt.env.json and change the username, and authkey values. Note we're trying to preserve the %40 value between the userid%40mycompany.com.
For this test, you do not need to have the selenium server running because we will be using the behat-cbt.hbs.yml and the value of wd_host which the hub at crossbrowsertesting. You can leave the selenium-server running if you like, it won't cause any issues.
The devices that we will use for this test are defined in features/cbt. The file featues/cbt/devices.json contains the list of devices to run the test with. If you want to see all the available devices, you can run the features/getBrowser.sh script after you update the CBT
Let's run our test by entering the following in a new terminal window: composer behat-cbt. Once the test starts, you can log into CBT and go here https://app.crossbrowsertesting.com/selenium?tab=recent to view which device is running as shown here: 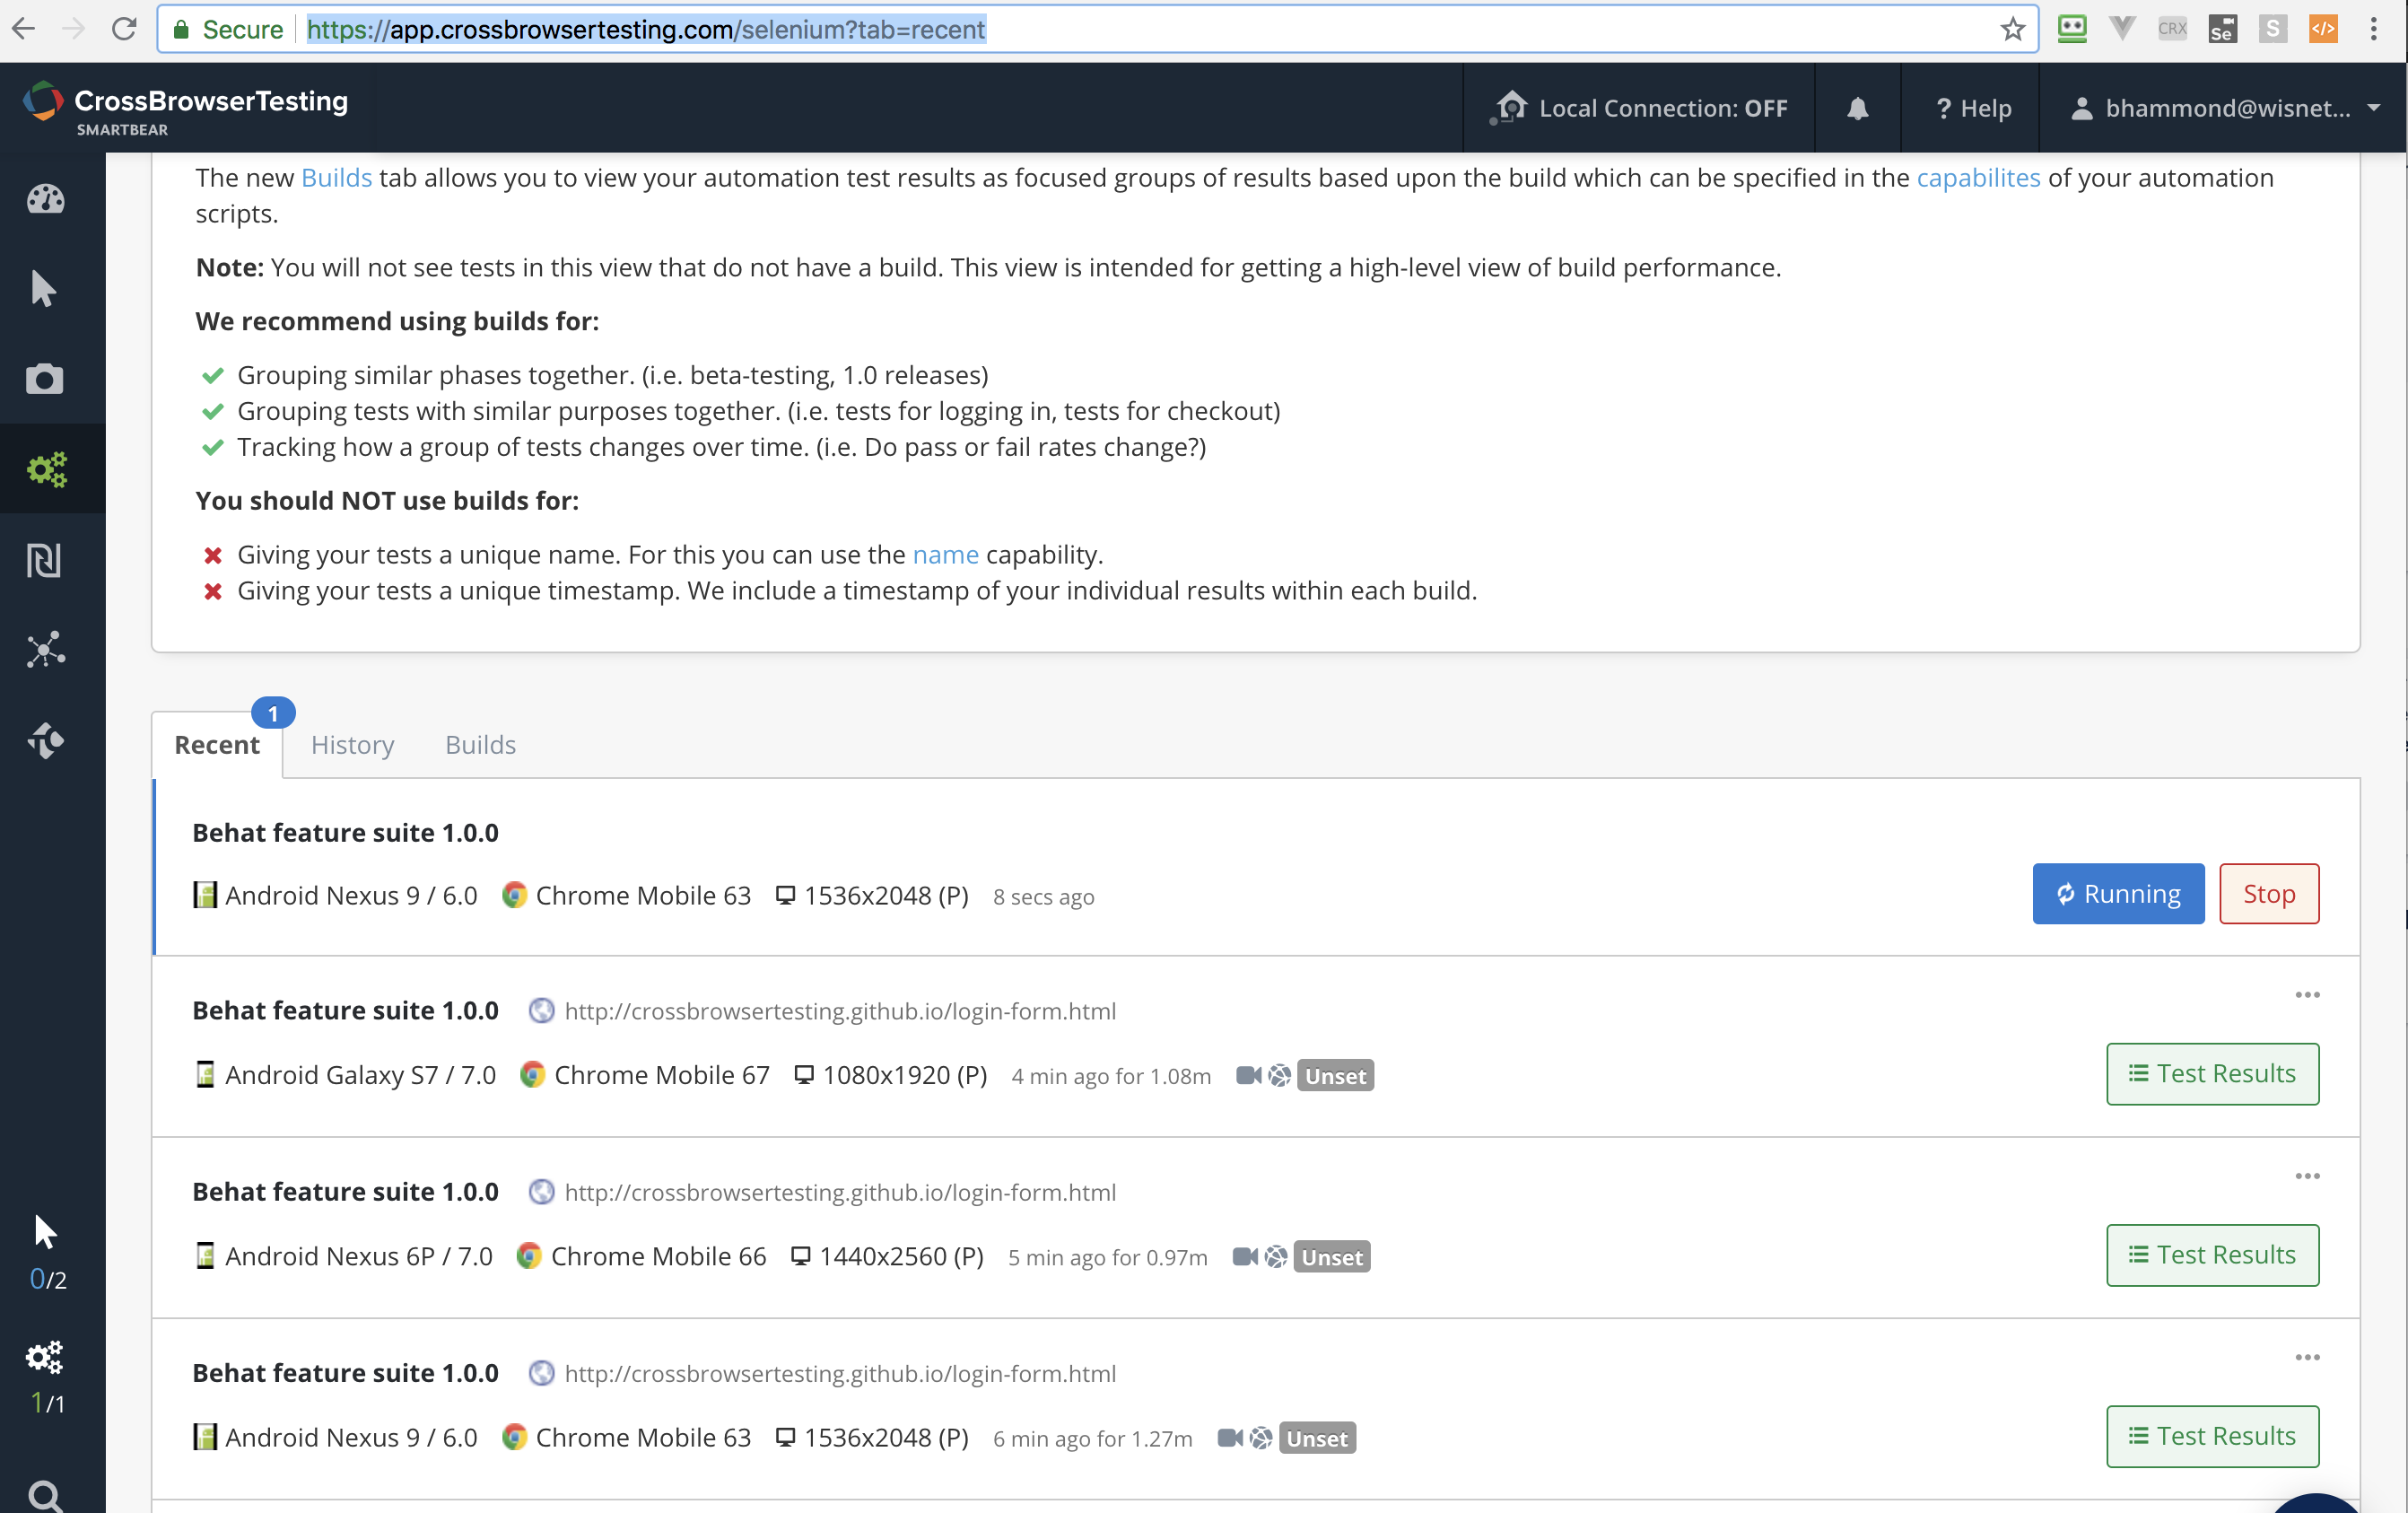
At the completion, you should see similar to the following depending upon how many devices were tested:
Feature: Login to page
    A login attempt with valid credentials
    Should be accepted
    And a login attempt with bad credentials
    Should be rejected

  @javascript @snapshot
  Scenario: Login with bad credentials                                   # /Users/bartonhammond/projects/POMexample/features/temp/loginForm.feature:8
    Given I go to the "Login form" page                                  # ProjectContext::iGoToThePage()
    And I fill the "username" with "badusername@crossbrowsertesting.com" # ProjectContext::iFillTheWith()
    And I fill the "password" with "badpassword"                         # ProjectContext::iFillTheWith()
    And I click the "submit" button                                      # ProjectContext::iClickTheButton()
    And I wait for the "Verifying credentials" spinner                   # ProjectContext::iWaitForTheSpinner()
    Then the "Username or password is incorrect" element exists          # ProjectContext::theElementExists()
    And I take a snapshot called 'failed_login'                          # ProjectContext::iTakeASnapshotCalled()

  Scenario: Login with good credentials                             # /Users/bartonhammond/projects/POMexample/features/temp/loginForm.feature:19
    Given I go to the "Login form" page                             # ProjectContext::iGoToThePage()
    And I fill the "username" with "tester@crossbrowsertesting.com" # ProjectContext::iFillTheWith()
    And I fill the "password" with "test123"                        # ProjectContext::iFillTheWith()
    And I click the "submit" button                                 # ProjectContext::iClickTheButton()
    And I wait for the "Verifying credentials" spinner              # ProjectContext::iWaitForTheSpinner()
    Then the "You are now logged in!" element exists                # ProjectContext::theElementExists()
    And I take a snapshot called 'successfull_login'                # ProjectContext::iTakeASnapshotCalled()

2 scenarios (2 passed)
14 steps (14 passed)
1m41.26s (12.15Mb)
Exit status : 0
There are also two other reports that were generated and you can find them at features/results/YYYY-MM-DD-HH-MM-loginForm depending on the time you run the test. Open that directory and you'll see multiple files but the important one to start with is the index.html.
Using your browser, use File->Open File and navigate to the project and then to features/results and look for the latest directory. Open the index.html. This report looks like this: 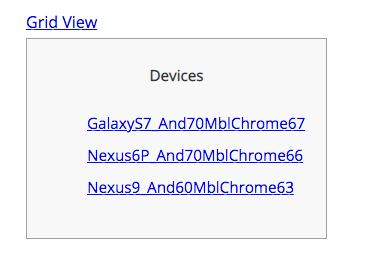
If you click into one of the devices you'll see a report that combines the actual Gherkin statements along w/ in context screenshots as shown here: 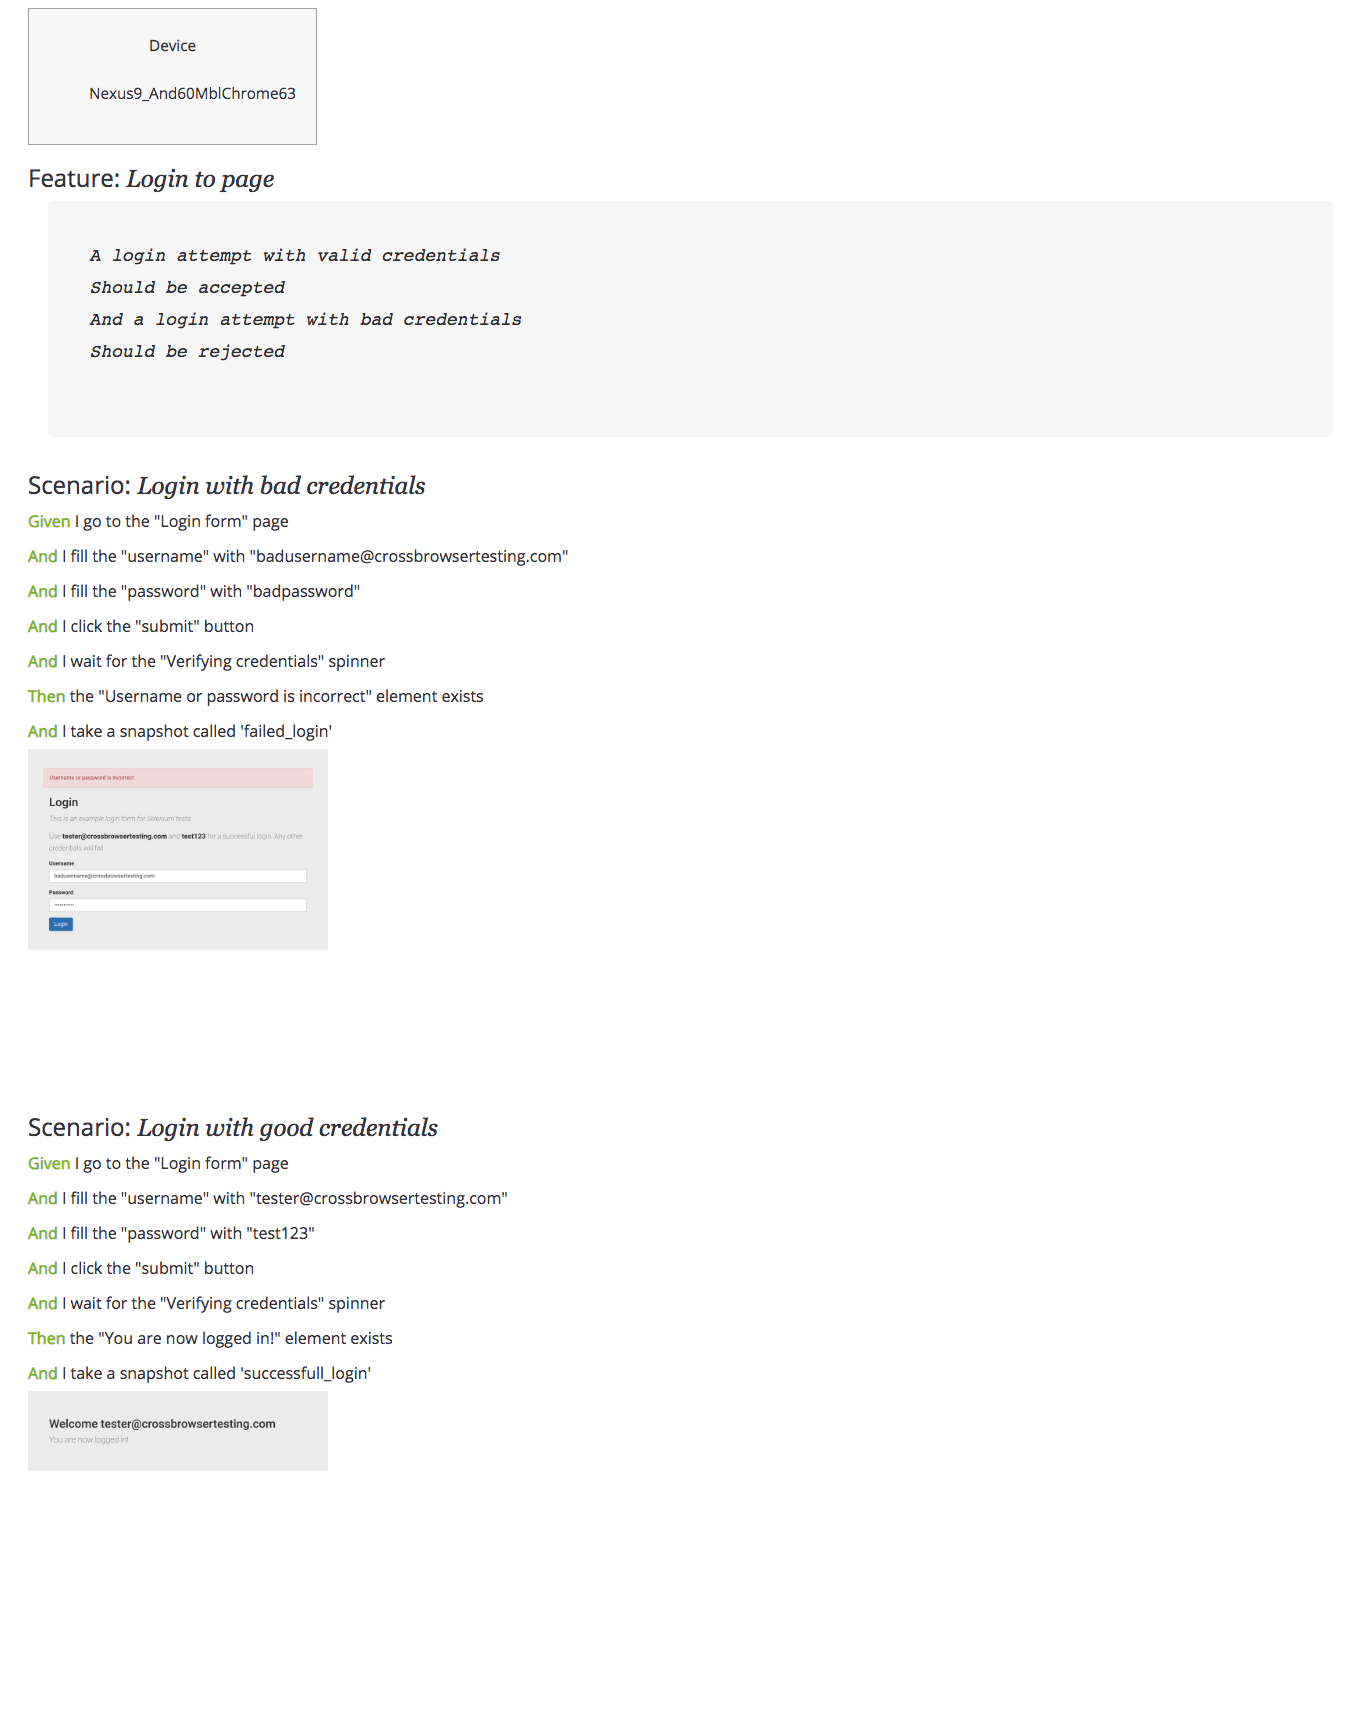
Another very useful report is grid.html located in the same directory and it looks like this 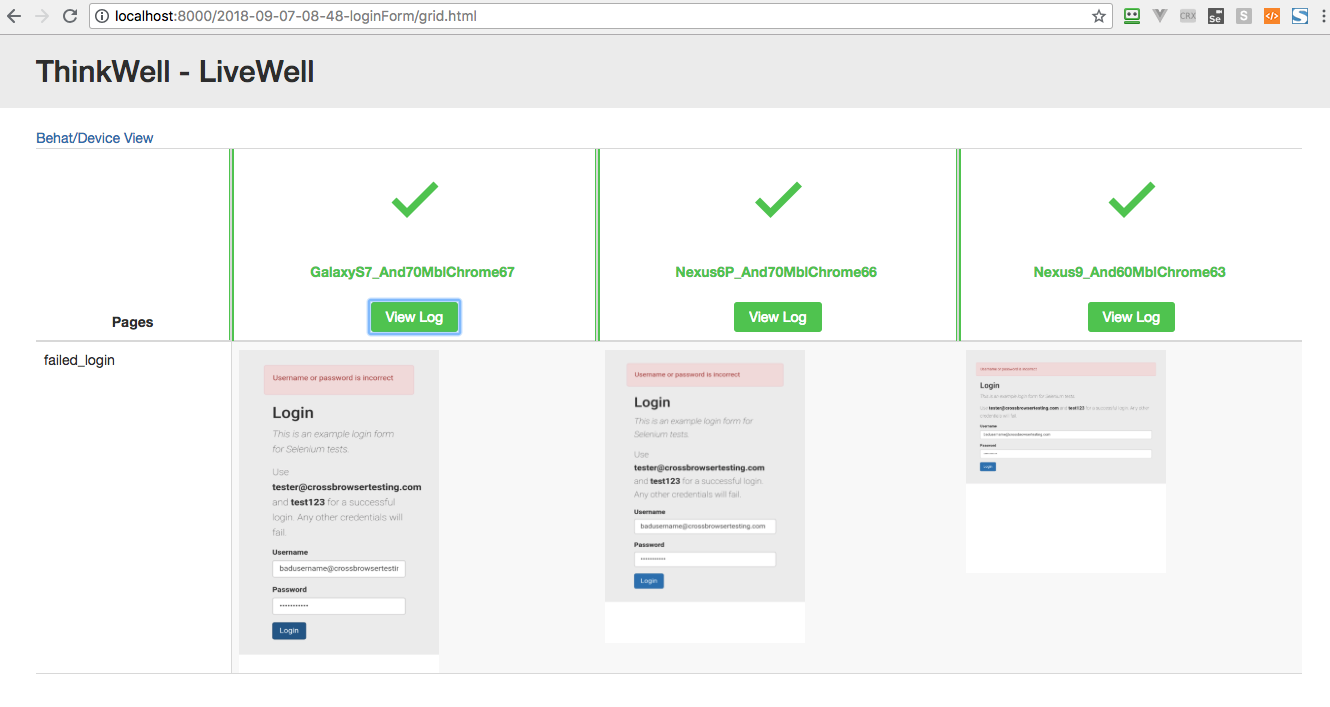 . This shows all the devices that were run, in our case 3 devices. Each device has their screenshots in that column. Each row in the table are the images for the same page. This makes it easy for the UI folks to compare the same screen shot across multiple browsers.
In the header row, there is going to be either a Green checkbox or a Red failure mark. If there is a failure, you can click on the Log to see the logs from the run as shown here: 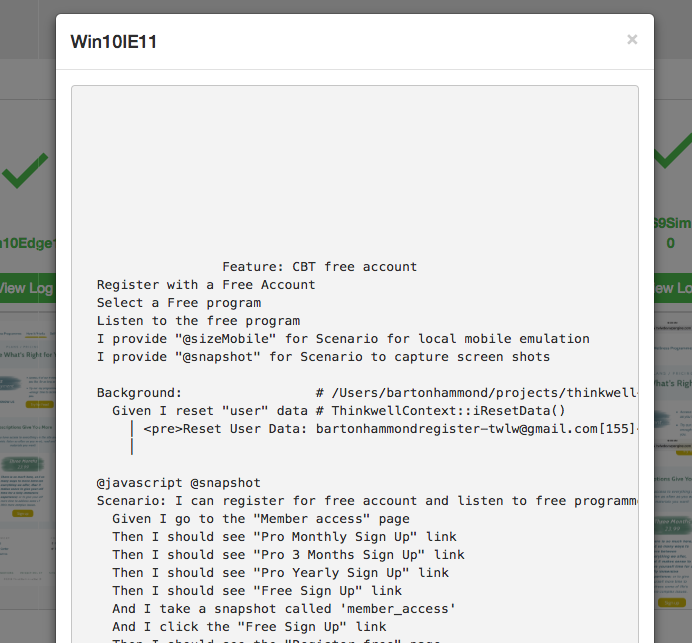 .
.
If you click on any screenshot, you can see a larger version: